Starting a calisthenics routine as a beginner might seem like a daunting task.
Most of the videos you find online usually demonstrate difficult exercises meant for intermediate or advanced calisthenics practitioners.
Well, the truth is that they don’t need to be. In fact, here at calisthenics gear, we are firm believers that simple is beautiful. And many top level athletes seem to be believe.
Ross Enamait, a boxing coach, just shared a great and simple workout he does while on the road, in his hotel rooms.
But anyways, in this post, we hope to inspire you to start working on the basics, with a simple, 3 phase routine for beginners that shouldn’t take you more than 30 minutes to do.
But before we begin, it is important to lay down some fundamentals in relation to the ethos of calisthenics and training in general:
- Calisthenics is all about movement: Half of the training will focus on strength, whilst the other, and arguably most important half will be about the muscle memory linked to an exercise.
To evolve in calisthenics, you need to be doing your movements consistently throughout your day/week.
- Make sure to give your body plenty of rest. This point might seem contradictory to the first one, but it really isn’t, as movements can be trained by simply visualising, watching other people do it, and doing a very small number of reps. Training 3 to 4 times a week is ideal, varying also the intensity week by week.
For example, 2 straight weeks of 4 high-intensity training days should be followed by a low-intensity training week of only 3 days of exercise.
- If you’re not doing the movements the right way, stop. The easiest way to get an injury is by forcing movements.
A common example is when the muscle up is done in two parts, moving one shoulder at a time over the bar. This often results in very serious shoulder injuries.
- In order to keep evolving, focus on exercises that you can do 6 to 10 repetitions. If you can do less than 6, you are not ready to do sets, if you can do more than 10, you are ready to move on, as your body isn’t benefiting strength-wise from this much repetition.
It’s important to note that this is only one free calisthenics program out of many possible.
It is a good base to start, but if you are serious about training, we highly recommend doing a paid course.
These can be super cheap and effective as the financial investment will give you extra motivation to actually stick to the program.
We’ve actually reviewed 3 programs that were designed by some of our favourite calisthenics athletics.
If you’re looking for a more structure approached with apps / pdfs / videos, here are our suggestions:
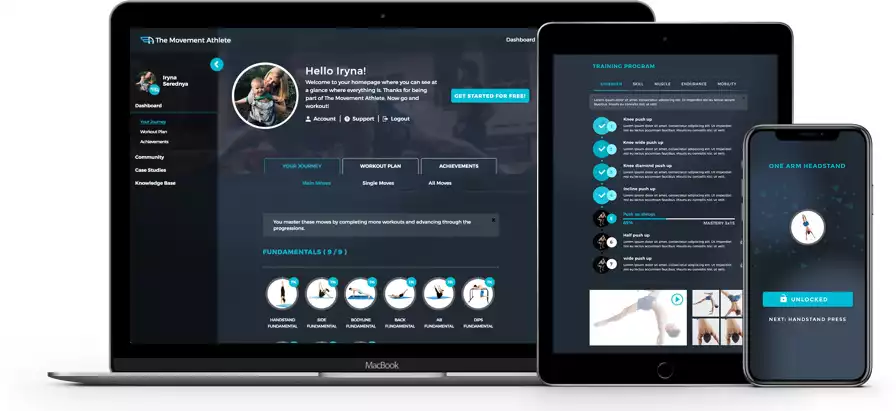
- Facebook Group
- 1000+ Videos
- Mobile Progression Based App
- Online Portal
- Personalized workouts based on initial assessment
- Mobile and Desktop

- Facebook group
- A lot of encouragement to talk to coaches
- PDFs (schedules)
- Excel Files (Evaluations)
- Online Portal / Dashboard
- Videos
- Mobile and Desktop- Desktop preferred
- Add-on subjects: Nutrition, Mobility, Regeneration, Amongst Others
- Facebook Group
- Bodyweight, Kettlebell, and Dumbbell Options Available
- Videos
- Online Portal
- Mobile and desktop
- Supporting Content on Breathwork, Motivation, Warm-ups, and More!
- Facebook Group
- Sub-reddit - Extra paid "family" community
- 17 Core Classes + Extras
- Hundreds of Videos
- Online Portal
- Desktop preferred
- Supporting Content on Nutrition, Motivation, and More
- Facebook group
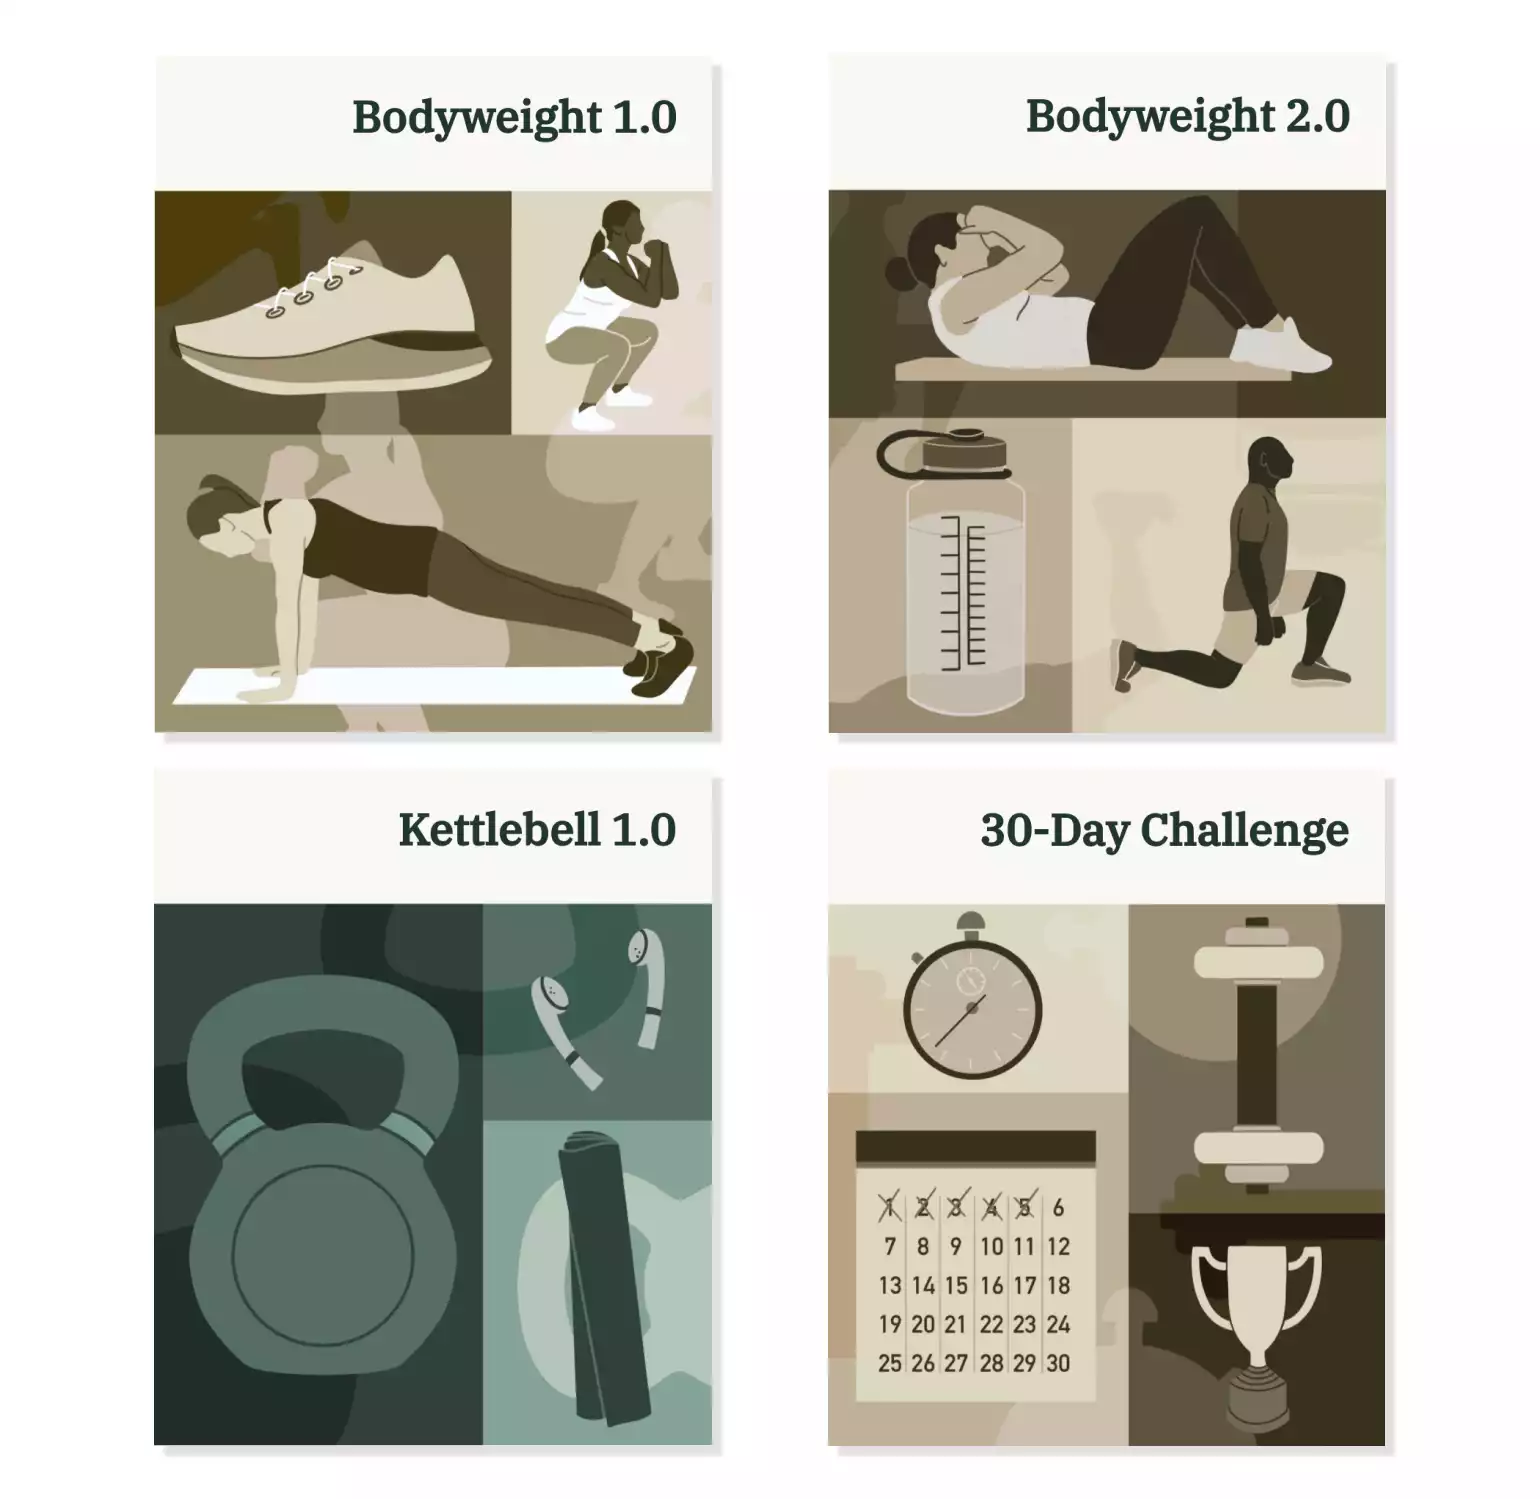
- Bodyweight 1.0 workout program
- Bodyweight 2.0 workout program
- Kettlebell 10-weeks
- 30-Day Challenge
- 4 Printable PDF workout calendars
- Bonus: Intro to Nutrition and Healthy Eating
- All programs come in mobile friendly and desktop versions
- All PDF programs come with links to video explanations
Now, on to the home calisthenics workout.
If you want to skip the bulk of the text, which we don’t recommend as we’ll be going through some great tips and progressions, here is the condensed workout in infographic format:
What is Calisthenics?
Simply put, calisthenics is resistance training with your own bodyweight. The name comes from the Greek words kallos and sthenos, respectively meaning “beauty” and “strength.” It refers to both the beauty of perfected motion, and the means through which you find your own beauty and strength.
It is by far the oldest method of training your body, going as far as ancient Sparta and beyond. Of course with age comes refinement, so bodyweight exercises are also the most tried-and-true way of working out. With calisthenics, you always know what you’re getting into, which progression leads to which, and how far along you are in your training.
Back around the 80s, bodyweight exercise seemed to have fallen out of favor due to the widespread availability of gyms and weights. But as tides shifted, so did people again start seeing the many values of this more traditional approach.
If there’s ever been a good time to get into into calisthenics–whether casually or professionally–that time is now!
Why Calisthenics?
Being the most perfected method of training available, bodyweight training has a long list of benefits. These include:
- A substantial increase in strength. This admittedly holds true for nearly all ways of working out. However–a major selling point for calisthenics in this regard, even when compared to weight training which traditionally outshines it–is the fact that it gives you the complete package. Bodyweight exercises are almost exclusively compound moves, so working out one part of your body while neglecting another is more or less impossible. With calisthenics, you will consistently and progressively keep getting stronger, all over.
- Drastically increased endurance. In fact, calisthenics may be the best way of training for high endurance. With lighter exercises, you can create high-rep courses which will transform you into a tireless machine. Going that far is of course optional, but that possibility is always there.
- Much better coordination. Being so reliant on form, these exercises will teach you to pay attention the minor (and not so minor) workings of your body as you do your reps. If your form is less than perfect, your training will suffer, so you be forced to work and improve on your brain-to-body connection. You will eventually come out as more graceful person with better balance and precision.
- Improved cardiovascular health. Like all ways of training, calisthenics puts your heart into overdrive, strengthening it as it pumps more blood into your muscles. Without taking into account complications such as disease, you will live a longer, more pleasant life.
- The ability to train anywhere, at any time. Anyone who has ever maintained a gym membership knows how stale it can get to have to stick to a certain location, at a certain time. Sometimes you just want to take your workout out into the streets, or even into the wild. Calisthenics will let you do that, with zero negative impact on the outcome!
- It’s free! More of a continuation of the previous fact, but no less valid. When it comes to calisthenics, every single piece of gear is optional! It may help a lot, it may improve the way you do a certain move, but there is no need to pay upfront–for anything!
- It is extremely safe. Done correctly, a bodyweight workout program is about the safest thing you can possibly do. Your body is built to last, and it will quickly warn you when it doesn’t like something you’re forcing it into.
- A wide array of approaches for anyone. Want a strength-building course? Calisthenics has you covered. Wish to improve balance and posture? Take your pick. Want to learn a special calisthenics skill? Someone, somewhere, has already written a detailed workout program, and all you need to do is find it! And speaking of calisthenics skills…
- You can impress people! Sure, deadlifting impossible numbers seems nice on paper, but tends to lose its luster the more times you see it. A planche, front lever, handstand pushups and the like though, always remain impressive! There are more of these crazy calisthenics skills than can be counted, and training oneself to attain them can be a worthwhile goal of its own.
The 30 minute calisthenics workout: Warming up and Stretching for Calisthenics
Now that we have gone through the basics, it’s time to get the workout started. But before that, let’s warm up.
Warmup Exercise 1- Bar hanging.
We quite like this exercise as it both warms you up and develops strength in muscles that are essential for calisthenics with low intensity and risk.
The idea is to hang in the bar for as much time as you can. When this position begins to feel comfortable, you can incorporate a few movements, for example:
- Knee raises
- Twsiting to the sides
- Flips
Warmup Exercise 2: Shoulder and chest warmup
No need to get too fancy, arm swings are sufficient. Have a look at the video below to get an idea of what a reasonable upper body warmup looks like:
Warmup Exercise 3: Legs and full body warmup
Rope Jumping is probably our favourite warm up as it burns an enormous amount of calories, helping you lose weight which will, in turn, make you leaner and improve your calisthenics performance, and also warms up a lot of muscle groups without much risk of injury.
If you don’t have a jumping rope, a few laps around the gym/park are a good alternative
The exercise outlined above should be enough to warm up the body.In our opinion, stretching before exercises is pretty pointless, but as this is a controversial debate, we will let you decide for yourself whether you should stretch or not.
Phase 1- Beginner Upper Body Calisthenics Exercises for Beginners
Now that your body is ready to start exercising, you should hit the high-intensity exercises first. We begin with push-ups as a bridge between the warm-up and the high-intensity exercises, which in this case will be pull up variations.
For a video demonstration of the below exercises, have a look at this video:
Exercise 1: Push up Progression
Push ups are essential to your calisthenics progression. They can be done in various ways to work on different muscles and getting comfortable in the push up position will help you in other static and movement-based exercises.
Requirement 1: Do at least 10 knee push ups
This beginner variation of push ups consists on getting on your knees and doing push ups. This puts less strain on your upper body and makes it easier to do the exercise.
If you can easily to 10 of these, you’re ready for normal push ups.
Requirement 2: 10 Normal push ups.
Normal push ups are a great first exercise. They’ll allow your upper body to warm up without causing much fatigue.
If you’re comfortable doing 8 to 10 of these, try staying in a static position halfway through the push up for at least 15 seconds in your last rep.
Exercise 2: Bar/Pull Up Progression
Requirement 1: Do at least 6 Australian Pull Ups
Australian pull ups are a great exercise to get you started on pull up progressions. From Australian pull ups, you can go to normal pull ups, and then muscle ups and all associated variants.
Start off by trying to do them with a waist-high bar, and if this feels too difficult, increase the height of the bar to about chest high.
This should make the exercise easier.
Once you can do at least 6, ideally 8 to 10, Australian pull ups in a waist-high bar, you are ready to try normal pull ups.
Requirement 2: Do at least 6 normal pull ups.
Grab the bar with the hands at shoulder distance and try to do to as many pull ups as you can. If you’re struggling to get to 6, try doing the last reps by jumping to the bar and coming down as slowly as you can.
If, at the beginning, you are struggling to reach 6 pull ups, try getting a resistance band and using that to help you reach 6 repetitions.
Requirement 3: Pull up variations
There are endless pull up variations, but if you’re tired of normal pull ups, here are some more challenging variations:
- Wide hands
- Chin ups
- Flags
- Muscle ups
(Extra) Exercise 3: Handstand Progression
Handstands are excellent all-rounders that are particularly good for your arms. Sure, they may seem a bit intimidating, but then again so do most good things. Before moving on to them however, you should be able to pull off:
Requirement 1: 10 Bridges
Bridges not only hit most of your body, but also help you get used to the skewed perspective that comes with handstands in the first place. In addition, they double as a flexibility exercise. There is no reason not to do bridges, just don’t neglect to throw in at least one more arm exercise so they don’t get rusty while you’re on this progression.
Requirement 2: 8 Wall walks
Lay down on your stomach with your feet touching the wall. Walk backward and up the wall while matching your legs’ pace with your arms. Once you’re reached a “sort of” handstand, hold the position for a couple seconds, then walk back down.
Once you are able to get into a full handstand with this method–congrats!
You’ve moved on to the full package!For some additionaloomph, considerone-handed handstandsorhandstand push-ups; both are absolutely amazing!
Phase 2- Beginner Core Calisthenics Exercises for Beginners
“Core” is the generic term for the region between your waist and neck. Usually, it refers to the lower part, the abs and lats, and not so much the chest area.
Exercise 1: Dip Progression
The dip is an essential exercise for developing your lats. These muscles, in turn, will be essential for completing more advanced moves such as muscle ups, front and back levers, l-sits and many other exercises.
It’s no coincidence that most advanced calisthenics athletes have v-shaped backs.
We didn’t record a video for this exercise, but we found Linday’s Camerick video to be quite good in explaining this progression:
Requirement 1: 10 Bench Dips
Grab a bench/wall/chair and extend your legs as the image below shows. Now bend down almost to the floor and raise yourself back up again.
If doing this exercise with your legs extended is too hard, try bending your knees.
Once you can easily hit 10 reps, you’re ready to try the parallel bars
Requirement 2: 10 Parallel bar dips
Put yourself between the two parallel bars and grab them. Elevate your body bringing the chest forward and legs slightly backwards. Now lower yourself as low as you can or until your arms form an angle of 45º.
If you can easily do 10 reps of this, we suggest trying bar dips.
Exercise 2- Knee raise progression
Finally, we move to one of the most abs intensive exercise- Knee raises.
Once again, we didn’t record a video for this progression, but found that Al Kavaldo’s progression, even though slightly different, is quite good too:
Requirement 1: 12 Frog Raises
Lie on the floor with your arms next to your body and palms of the hands facing down.
Now raise your legs until they are 90 degrees from the floor.Repeat this movement 12 times without raising your head and shoulders too much from the ground.If this is easy for you, you might be ready to give the bar a go.
Requirement 2: 8 knee raises in the bar
Hang from the bar with your hands approximately at shoulder distance. Now bend your legs and bring them to the chest. Try to minimize the swing by keeping your core steady.
If you can do this 8 times, you should be ready to try leg raises.
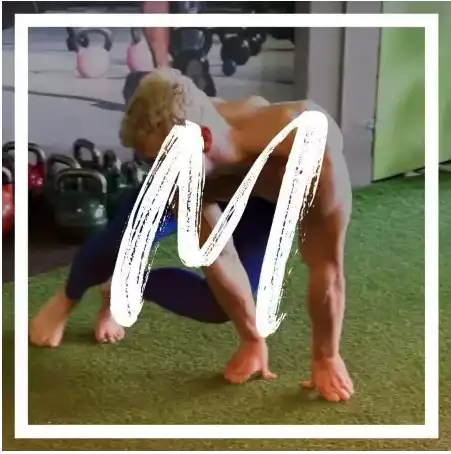
(Extra) Exercise 3- Dragon flag progression
Once again, if you want to make your workout a little bit longer, we suggest working on the dragon flag.
This is an advanced exercise that will leave your core burning for days, this one requires a strong base to begin with, so we only recommend it to those with a good number of dips and leg raises under their belt.
Done correctly, it should look like the video below demonstrates, but don’t let Mr. Kavadlo’s perfect form discourage you.
Before taking on dragon flags, we recommend these progressions:
Requirement 1: 8 Leg Raises
We’ve already gone over how useful these are. Before tackling the full dragon flag, you should at the very least be able to do eight.
Requirement 2: 8 Negative dragon flags
While keeping yourself steady on the ground, the board, or whatever it is you work out on, kick your legs up and form a straight line with your legs and torso. Then proceed to slowly lower yourself down.
This will not only work your core, but help your coordination in regards to the proper dragon flag. Once you can consistenly pull of eight of them, you should be ready at the very least attempt the full exercise–and avoid injury.
Phase 3- Beginner Static/Stretching Calisthenics Exercises for Beginners
To finish off the workout, we move to the less intense set of exercises- the static phase.
A lot of these exercises will depend on flexibility, so throughout this phase, feel free to stretch.
Exercise 1- L-sit Progression
The l-sit is one of the most versatile static exercises in calisthenics. It can be done in parallel bars, normal bars, monkey bars, and even on the ground. We didn’t record a video for this one, but here’s a great progression tutorial by Antranik:
Requirement 1: 1 minute in the foot supported l-sit position
Sit down on the floor/mat with the legs stretched and both hands beside your hips, facing the ground. Lift your body maintaining the feet on the floor.
Hold for one minute.
Requirement 2: 1 minute in the 1 foot supported l-sit position
Same as above, but lifting one foot.
Requirement 3: 1 minute in the l-sit (no foot) position
If you can easily hold the one foot l-sit position, try lifting both feet. You might have to push your body slightly backwards, with your hands now laying beside your quads.
Exercise 2: Plank
If you’ve still got energy, why not go for a plank or two?
There is no progression here, simply try to hold as much time as you can in the plank position, as shown below. If you can’t hold the plank, try doing it with your knees touching the ground
How to Progress in Calisthenics?
Everyone eventually hits a wall. Whether it’s getting stuck on a certain progression or number of reps, it’s bound to happen to everyone.
However, no wall is unbreakable. We all have weak links that can be improved on. In addition, we all make mistakes at some point. Whenever it feels like you’ve been at your limit for a good while, it’s always good to ask yourself:
- Are you eating enough? Or well enough? Try as you might, you can’t make muscle out of nothing. A high-protein diet is pretty much mandatory in order to get anywhere. Consult an online guide on what you’re eating and how much, and make corrections as necessary. Not doing this would be like trying to build a house with no foundation.
- Are you getting enough sleep? A body has priorities, which chronic exhaustion will easily hijack and override. No matter how hard you’re training or the quality of the fuel you’re tossing into your furnace, if all your brain is thinking is “I’m exhausted,” then a significant amount of your resources will be redirected to easing its symptoms. Don’t let things get that far. Rest when you need to.
- Are you training too little? Too much? Two to three workout sessions per week are optimal, and going over will benefit no one. In fact, overtraining is one of the most common causes of slowed (or no) progress. Don’t sabotage yourself. Your day will come.
- Are you maintaining proper form? It can happen to everyone. Somewhere along the way, you’re taught yourself the wrong way of doing a particular exercise. No biggie. Just renew what you know on YouTube. You reps may be a bit iffy while you relearn the proper motions, but you’ll quickly get over it.
- Try slower reps for a while. Slower reps mean more resistance. More resistance means greater gains. Do this for a couple weeks, and don’t worry about the total number of reps. You’ll be surprised by the results when you get back to your initial speed.
Final Thoughts
And that’s it! The end of the workout! If you made it this far, congratulations.
If you skipped some exercises, that’s ok.
This is only one full body calisthenics workout of many possible. It is in no way perfect, but, in our opinion, it does a pretty good job of covering all major muscle groups, as well as introducing the most important calisthenics movements.
We designed this program with all types of students in mind.Wether you are in good shape or over weight.It’s a very fast but effective workout, which should be supplemented with additional exercises as you progress.
We hope that this guide has helped you give the first steps in the calisthenics world, and if you have any suggestions, feel free to leave them in the comment box below.
Chris is an experienced Calisthenics practitioner focused on isometric exercises and street workout. He founded thehybridathlete.com in 2017, which was subsequently acquired by theyhybridathlete.com
He is based in Portland and has been working out using solely his own body weight and bars for the past 6 years.